Installing InterformNG2 on Windows
Before upgrading to version 3.5.0 or newer from a pre 3.5.0 version
Regarding this folder:
<INTERFORMNG2-INSTALL-LOCATION>\jre\lib\extIf you have added one or more .jar files to this folder, then before installing the new version, make a copy of those jars (do not copy the ones that are there by default in Java 8, only the ones you have added).
The entire jre folder will be deleted by the installer, so this has to be done prior to installation.
After installing InterformNG2, the installer has created a new folder
<INTERFORMNG2-INSTALL-LOCATION>\libextIn order to install, you first need to unzip the distribution file, and then run the unzipped installation file. Now you will see these screens:
Click Next on the screen above.
You need to accept the agreement in order to be able to proceed:
Now state the place where InterformNG2 should be installed. The path below is suggested:
The next screen asks for the path for where data files and configuration files should be placed.
The default path is:
C:\Program Data\InterFormNG2(Please check/correct the exact path in your installation).
Please make sure if this path is OK and change it if needed. You will need to use this path whenever InterformNG2 is exchanging files e.g. XML files, so a more simple path may be a good idea. The selected path is referenced as {INTERFORMNG2_HOME} in this manual and is stored as the environment variable, INTERFORMNG2_HOME.
Workflows cannot read from or write to paths inside the installation folder - the folder containing NG2.exe, application-default.properties, and the jre and modules folders. The filesystem allow-list does not change this, so adding such a path as an approved root has no effect.
The defaults keep the two apart - C:\Program Files\InterFormNG2 for the installation and C:\ProgramData\InterFormNG2 for the data (INTERFORMNG2_HOME). If you change them, do not place the data folder inside the installation folder.
Upgrading from a version before 4.4.0: if both are in the same folder today, move your workflow input and output folders to a directory outside the installation folder and add that directory as an approved root in the filesystem allow-list.
Next you need to decide if you want to connect to InterformNG2 with http (unsecure) or https (secure):
If you select https you need to consider the certificate to be used, and the next screen is shown (only if you select https above):
The details are covered here.
Click Install on the last screen to start the installation:
When the installation is done this screen is shown:
Before starting the InterformNG2 process, you should consider what port number to use, when accessing InterformNG2. The default port number is 8086, so that you can access InterformNG2 locally via either:
https://127.0.0.1:8086 or http://127.0.0.1:8086 - depending on if you have activated https or http in the install screen above.
Here you can sign on for the first time.
Now you might need a license code for InterformNG2.
Request and installation of a license code is covered here: The license code.
If required you can setup InterFormNG2 to run under a specific user. This might be necessary to give InterformNG2 access to folders on other machines like IFS on an AS400.
Silent (unattended) installation on Windows
- /VERYSILENT — installs with no user interface.
- /SILENT — shows a progress window but asks no questions.
Parameter | Purpose | Default if not specified |
/DIR="PATH" | Specifies the folder where the application files should be installed. | C:\Program Files\InterFormNG2 for a new installation, or the existing installation location in case of an upgrade. |
/DATA_DIR="PATH" | Specifies the data folder containing the data and configuration files (INTERFORMNG2_HOME). Must not be inside /DIR. | C:\ProgramData\InterFormNG2 for a new installation, or the existing data location in case of an upgrade. |
/USE_HTTPS=true or /USE_HTTPS=false | Use true to enable HTTPS or false to use HTTP only. | true |
/LOG="FILENAME" | Writes a log of the installation to the specified file. | No log file. |
./InterFormNG2-4.4.0.exe /VERYSILENT /DIR="C:\Program Files\InterFormNG2_silent" /DATA_DIR="D:\ng2_data" /USE_HTTPS=false /LOG="installlog.txt"Application-default.properties on Windows
The application-default.properties is the file, that contains the main configuration of the InterformNG2 installation. On the Windows platform you can find this file in the directory: C:\Program Files\InterFormNG2. For some special configuration you might need to edit this file. You can edit it with a simple text editor like notepad or notepad++.
From version 4.4.0 the installer adds the property ng2.keystore.password to this file if it is not already present. See Common Keystore.
RAM usage
InterformNG2 runs as default with 4Gb RAM, but if InterformNG2 is processing very large files (or running multi-tenant), then it might be a good idea to increase the usage to 8Gb RAM. This is covered in this section.
Temporary folder for Windows work files
From version 2.4.0 the default folder, that is used for temporary work files (on the Windows platform) is: {{env:INTERFORMNG2_HOME}}/temp.
It is possible to set another folder to be used for work files. You can setup such a directory, if you create a new file named: NG2.exe.vmoptions in the directory:
C:\Program Files\InterFormNG2-Djava.io.tmpdir=<DIR>
Run the
InterformNG2 service under a specific user
On the Windows platform you can choose to run the service under a specific user. This might be required, if you e.g. want to monitor an IFS folder on an AS400 on the Windows platform.
In order to change the user for the InterformNG2 service you need to start the services application:
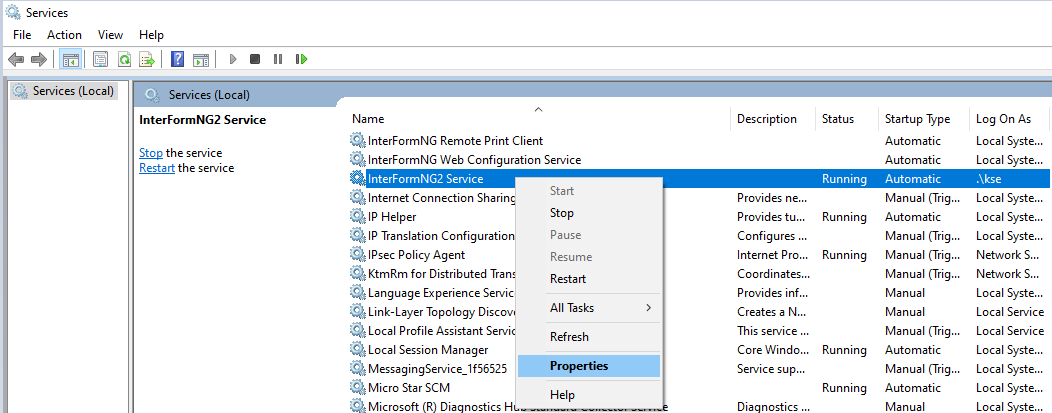
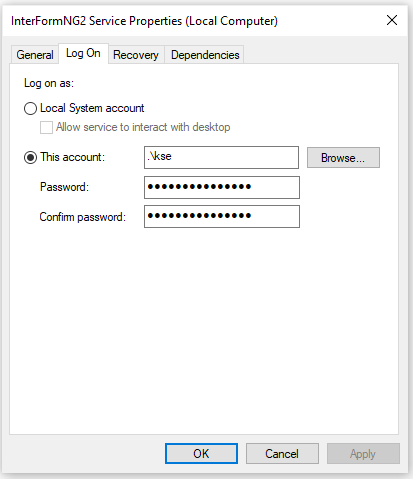
If you right click on the InterformNG2 Service and then select Properties like above, then you can choose to assign a specific user for this service: